(→The Sliding Door) |
|||
| (54 intermediate revisions by one other user not shown) | |||
| Line 2: | Line 2: | ||
In this Tutorial we will illustrate the construction and configuration of three scripted doors: the Sliding Door, the Double Sliding Door and the Swinging Door. | In this Tutorial we will illustrate the construction and configuration of three scripted doors: the Sliding Door, the Double Sliding Door and the Swinging Door. | ||
| − | + | These doors are all presently a bit simple. We'll be updating both the doors themselves and the wiki as needed. | |
Doors could be said to be ''complex game objects''. They are structured collections of GameObjects and Components, and how they are assembled and "wired up" is essential to their operation. They will typically consist of some sort of framing in which the door proper and possibly a hinge sits, and the door, which may be a single mesh or in the case of the swinging door, an empty GameObject "hinge" to which the door mesh is a child. | Doors could be said to be ''complex game objects''. They are structured collections of GameObjects and Components, and how they are assembled and "wired up" is essential to their operation. They will typically consist of some sort of framing in which the door proper and possibly a hinge sits, and the door, which may be a single mesh or in the case of the swinging door, an empty GameObject "hinge" to which the door mesh is a child. | ||
| Line 8: | Line 8: | ||
Additionally, the various GameObjects will have certain components associated with them, typically to facilitate user interaction and to animate the GameObject. | Additionally, the various GameObjects will have certain components associated with them, typically to facilitate user interaction and to animate the GameObject. | ||
| − | Setting up doors can be a bit tricky, but creating content for | + | Setting up doors can be a bit tricky, but creating content for Unity is not for the faint of heart. Hopefully, with this tutorial we can make that workflow somewhat less painful for Sinespace creators. |
| + | '''Level:''' | ||
| + | * Beginner Unity/Sinespace, intermediate experienced with animation and game level design | ||
| + | |||
| + | '''Goals:''' | ||
| + | * Learn your way around Unity with Sinespace editor extensions | ||
| + | * Learn about the animation system and collision triggers | ||
| + | * Reproduce three different self contained game object doors | ||
| + | |||
| + | Note that the first tutorial walks the content maker through very detailed workflows in order to acclimate the user to the tools and processes by which the game object is created. The remaining tutorials will not seek this depth of instruction, but rather will refer back to the first. Therefor, it's fairly important you should build at least the first door in order to grasp the fundamentals that will be somewhat bypassed in the tutorials for the remaining two doors. | ||
| + | |||
| + | If you are an experienced Unity user who is using this wiki article as a reference, feel free to skip ahead or around as needed, and god love you and help you :) | ||
===The Sliding Door=== | ===The Sliding Door=== | ||
| − | The ''Single Panel Sliding Door'' is perhaps the simplest possible articulated door. Before we get into a step-by-step | + | The ''Single Panel Sliding Door'' is perhaps the simplest possible articulated door. Before we get into a step-by-step walk-through of it's construction, lets break it down conceptually from the top level. |
Firstly, there are three requirements of any door: | Firstly, there are three requirements of any door: | ||
* it must be somehow attached or stationary relative to some enclosure | * it must be somehow attached or stationary relative to some enclosure | ||
| − | * it must provide ingress to the enclosure to which it is | + | * it must provide ingress to the enclosure to which it is attached |
| − | * similarly, it must provide egress from the | + | * similarly, it must provide egress from the enclosure to which it is attached |
| + | |||
| + | Given these requirements, we could say that we will need a structure for the door frame, of arbitrary complexity, and a structure for the door proper, of equally arbitrary complexity. | ||
| + | |||
| + | For this door, our doorframe will be fairly complex, consisting of a transom piece, a threshold piece, and left and right door posts. The door will be a single cube mesh of appropriate size and proportions to fit suitably within the frame. | ||
| + | |||
| + | To get started, create a new project for space, or perhaps use one that you have available for experimentation and development. Use the ''Main Menu'' to create the first of the cubes we'll use (''Main Menu: GameObject->3D Object->Cube''). Just under the left side of the main menu, click the button to expose the scaling tools. Scale the cube a bit higher than the head of the avatar you would use to walk through the door, and then a little wider than that avatar; on the remaining axis, make it proportionately thick. | ||
| + | ---- | ||
| + | {| border="0" | ||
| + | ! [[File:Space-1-panel-sliding-door-tutorial-01.png]] | ||
| + | |- | ||
| + | ! | ||
| + | |- | ||
| + | ! ''Fig. 1: Sizing the door'' | ||
| + | |- | ||
| + | |} | ||
| + | ---- | ||
| + | Next duplicate this cube. Be sure it is selected, as in the image above, then on the object in the hierarchy, ''right click->Duplicate''. | ||
| + | Now switch to the translation tool, and move the copy along the X axis until it is clear of the door. Switch back to the scaling tool, and edit the thickness in each horizontal direction to form the left door post. Duplicate this one just as you did the door previously, and using the translate tool, move it to the right of the door. | ||
| + | |||
| + | Perform similar operations for one each of a transom (above the door) and a threshold (below the door). It should look something similar to the image below: | ||
| + | ---- | ||
| + | {| border="0" | ||
| + | ! [[File:Space-1-panel-sliding-door-tutorial-02.png]] | ||
| + | |- | ||
| + | ! | ||
| + | |- | ||
| + | ! ''Fig. 2: The completed door frame'' | ||
| + | |- | ||
| + | |} | ||
| + | ---- | ||
| + | Now, we can't very well just fling down a couple of cube meshes and expect it to behave as a door; and we really need to start organizing things as a unit. This will be important structurally. Note also that the door's 'frame' is not as simple as it could be; it really just needs to be any rigid body mesh; in actuality, it doesn't have to be that even; it could simply be an empty game object, as in the next tutorial. The one constraint is that animation of the door will occur relative to this piece; it can be as simple or as elaborate as you like. I'd perhaps stop short of making it the bulk of a building's construction. | ||
| + | |||
| + | So first, lets rename those cubes. Let's make sure to get the names right, recognizing them will be important a little later in the process. Additionally, some structure will be important. Within the hierarchy window, create an empty GameObject (''RightClick Hierarchy Window->Create Empty''). Drag all the door and door frame pieces and drop them on the empty GameObject; then (again, in the hierarchy window) rename the game object something like 'SinglePanelSliding Door'. It should resemble the following image; no changes should occur in the geometry of your construction; only the logical structure in the hierachy window. | ||
| + | |||
| + | Should your door objects be oddly nested, just drag them all out and nest them as shown in the image below. | ||
| + | ---- | ||
| + | {| border="0" | ||
| + | ! [[File:Space-1-panel-sliding-door-tutorial-03.png]] | ||
| + | |- | ||
| + | ! | ||
| + | |- | ||
| + | ! ''Fig. 3: The logical structure of the door, highlighted in the Hierarchy view'' | ||
| + | |- | ||
| + | |} | ||
| + | ---- | ||
| + | This structure is actually very important, if not elaborate. We're working with the simplest possible door, so the structure is the simplest possible; but rest assured that it is crucial to the operation of the door. | ||
| + | |||
| + | Before we move on to the next thing, there's one last thing we need to do to each of the elements of the door frame: make them rigid bodies. This is accomplished by adding the 'Rigid Body' script component to the inspector pane when the object is selected in the hierarchy. Once this is added, uncheck 'Use Gravity' and check 'Is Kinematic'. | ||
| + | |||
| + | Now we can begin adding the components to the structure that facillitate it's operation. | ||
| + | |||
| + | First select the container GameObject created and renamed in the last step. Then click the large 'Add Component' button at the bottom of the inspector pane in the Unity interface. In the search field at the top of the window that appears, type 'Animator'. Click on the Animator component that appears as a search result, adding the component. Repeat once for each of 'Box Collider' and 'Proximity Activator'. | ||
| + | |||
| + | Lastly (for this step), resize the box colider as shown in the following image. Editing the box collider is initiated by clicking the icon labelled 'Edit Collider' in the inspector pane. Editing the colliders uses a slightly different interface than other unity editing widgets. There are small dots in the face center of each of the collider's faces; these are handles for translating the face along it's perpendicular axis. This is the only type of editing operation to which a box collider can be subjected. | ||
| + | ---- | ||
| + | {| border="0" | ||
| + | ! [[File:Space-1-panel-sliding-door-tutorial-04.png]] | ||
| + | |- | ||
| + | ! | ||
| + | |- | ||
| + | ! ''Fig. 4: The Box Collider'' | ||
| + | |- | ||
| + | |} | ||
| + | ---- | ||
| + | Next, in the inspector tab for the box collider, click the box for 'Is Trigger'. This will turn off collisions in a physics simulation sense, and enable the collider to behave as a sensor that triggers it's associated Proximity Activator. The Proximity Activator script multiplexes various signals to the animations defined in the ''Animation Controller'' configured within the Animator component. In our construct, these signals take the form of strings that are sent up as a result of the occurance of the events 'Activate' and 'Deactivate'. Multiple reactions to each of these two events may be configured in the inspector using the '+' button. They can also be removed with the '-' button. | ||
| + | |||
| + | At this point, it would probably be a good idea to create a folder in your project to contain the various elements of the animation. But you already did that probably :) If not, do that now, and get into the folder. Right click the emptiness, and ''Create->Animation Controller''. Double clicking the object in the folder (the Animation Controller) will allow you to begin editing the component. Before you do though, be aware we still don't have animation(s) created for the door, so what you see there will neccessarily reflect that degree of completion of the door's construction. | ||
| + | |||
| + | The animation controller is what is referred to as a ''State Machine''. It is often misidentified as a ''Finite State Machine'' or ''FSM''. It does not meet the requirement, however, as the state machine will exist in multiple states during transitions between states. | ||
| + | |||
| + | It is configured with an interface called a ''Node Editor''. More on that in a few minutes. | ||
| + | |||
| + | When you've finished fiddling with the Animation Controller (hopefully you didn't change stuff substantially), make sure you have the top-level door game object selected, and press 'Ctrl 6' on your keyboard (FYI you can also open the animation window for the selected object from the ''Windows'' menu on the ''Main Menu''). This will open the animation editor. The animation editor is a scene graph editor. ''Almost anything'' can be animated in unity. If you can click on it in the hierarchy and see modifiable properties in the inspector pane, chances are it is possible to use a scene graph to generate values for that property over the course of time, producing an animation of that property. | ||
| + | |||
| + | We will be using the scene graph editor to create three scene graphs: 1. the door in it's inactive state; essentially empty from an animation perspective. 2. The door transitioning from it's idle, ''closed'' state to an ''open'' state. and finally 3. The door transitioning from it's ''open'' state to it's ''closed'' state. These animations will form the basis for what happens once the collider triggers the proximity activator sending up the appropriate signals to the animation controller via the animator component. Starting to get the picture here? don't worry, if it hasn't already, it will start to come together soon. | ||
| + | |||
| + | Following is a screenshot of the unity editor with the animation controller exposed in the node editor interface, as it looks without our animations in the object's context: | ||
| + | ---- | ||
| + | {| border="0" | ||
| + | ! [[File:Space-1-panel-sliding-door-tutorial-05.png]] | ||
| + | |- | ||
| + | ! | ||
| + | |- | ||
| + | ! ''Fig 5: An early peek at the animation controller state machine within the node editor.'' | ||
| + | |- | ||
| + | |} | ||
| + | ---- | ||
| + | If your animation editor is not already open and displaying a button center-window labled 'Create', then select the top-level door game object in your hierarchy, and press 'Ctrl 6' on your keyboard. Then click that 'Create' button. | ||
| + | |||
| + | This will open a system file browser and prompt you for a new name for the ''clip'' as they are called within the context of the scene graph editor. Give it a unique and descriptive name; this will be the first of the three previously mentioned animations (Idle or 'closed'). When this is done, you will see the animation's name displayed on the scene graph editor's window/tab at the far left of the second row (toolbar). This is a drop down list, with the final item on the list always being 'Create New Clip...'. Go ahead and create all three and make sure they appear on the drop down list as shown in the image that follows: | ||
| + | ---- | ||
| + | {| border="0" | ||
| + | ! [[File:Space-1-panel-sliding-door-tutorial-06.png]] | ||
| + | |- | ||
| + | ! | ||
| + | |- | ||
| + | ! ''Fig. 6: Setting up the animation clips.'' | ||
| + | |- | ||
| + | |} | ||
| + | ---- | ||
| + | Select the clip for 'open' in the dropdown list, and click the 'Add Property' button. What this is going to do is instantiate a ''picker'' containing a tree of all the object properties who's values may be varied by scene graph. This picker structures the items into the tree based on the container hierarchy reflected in the folder-like organization in the hierarchy view. This is how that structure begins to impact the context of of the object vs it's animated properties. | ||
| + | |||
| + | The property you'll want to add will be ''Door->Transform->Position''. If your door is named something other than 'Door', then you'll want to pick your door name out of the picker tree instead. To finally add the property to you clip, click the little '+' to the right of the property you're adding. It should look a lot like this: | ||
| + | ---- | ||
| + | {| border="0" | ||
| + | ! [[File:Space-1-panel-sliding-door-tutorial-07.png]] | ||
| + | |- | ||
| + | ! | ||
| + | |- | ||
| + | ! ''Fig. 7: Adding properties to a clip so their scene graphs can be manipulated.'' | ||
| + | |- | ||
| + | |} | ||
| + | ---- | ||
| + | Having clicked the little plus, you'll now have a position property above the 'Add Property' button. Click the switch triangle to it's left to open it. You'll now see the scene graphs for each of the three properties of the position: X, Y, and Z. We'll be animating the 'X' property. On the time scale across the top of the scene graph opposite the properties, click about two thirds right on the scale. This should set the time cursor forwards about 2/3 the way through the scene graph. Next, right-click on the intersection between the X axis on the scene graph (horizontal, top property of the position), and the time cursor you just set. Select 'add keyframe' from the popup menu this click generates. You'll see a screen greatly resembling this: | ||
| + | ---- | ||
| + | {| border="0" | ||
| + | ! [[File:Space-1-panel-sliding-door-tutorial-08.png]] | ||
| + | |- | ||
| + | ! | ||
| + | |- | ||
| + | ! ''Fig. 8: Setting up Keyframes''. | ||
| + | |- | ||
| + | |} | ||
| + | ---- | ||
| + | Now click on the diamond that appeared on the scene timeline. This is your '''keyframe'''. You should also notice to the right of the property label back on the left side of the screen, a number. Click it. Select the number and copy it with 'Ctrl-C'. Change it from '0' to '1'. If yours has a different number, say, 6.73, make it 7.73, or perhaps 5.73 if you'd like to have the door slide to the other side. If you have rotated your door to some arbitrary rotation, you're going to have problems moving forward with this tutorial; but don't be concerned, there are straightforward methods for doing that, we're just not going there at this time. So, if you switch to your 'Scene' view, you'll see very something like this: | ||
| + | ---- | ||
| + | {| border="0" | ||
| + | ! [[File:Space-1-panel-sliding-door-tutorial-09.png]] | ||
| + | |- | ||
| + | ! | ||
| + | |- | ||
| + | ! ''Fig. 9: The scene view, with the scene graph cursor in the animation editor positioned on the final frame of the 'Open' animation.'' | ||
| + | |- | ||
| + | |} | ||
| + | ---- | ||
| + | If you haven't yet, switch back to the 'Animation' view. Don't confuse it with the 'Animator' view. Now on the dropdown list just above the properties tree for the door, select your 'close' clip. We've yet to fiddle with this one, so we repeat the process starting with adding a position property for the door (hint: it's a ''Transform''). | ||
| + | |||
| + | Next add a keyframe by right-clicking the intersection between the 'X' positional property and somewhere around 40 frames into the scene graph timeline. Finally, select the last diamond at the intersection of the scene graph and the 'X' property axis (it's the first frame). Now back on the left hand side where the numbers are, click whatever number is there and replace it with the one you copied earlier (Ctrl-V or Shift-Ins). You should have something approximating this: | ||
| + | ---- | ||
| + | {| border="0" | ||
| + | ! [[File:Space-1-panel-sliding-door-tutorial-10.png]] | ||
| + | |- | ||
| + | ! | ||
| + | |- | ||
| + | ! ''Fig. 10: Setting the initial value for a property in the animation editor.'' | ||
| + | |- | ||
| + | |} | ||
| + | ---- | ||
| + | Additionally, if you have a peek at your scene view, you will see that the door has closed again. That's a good thing (tm). Don't forget, we've been working in the 'Animation' view, not the 'Animator' view. That's about to change, though. | ||
| + | |||
| + | '''A quick note on authoring animations in Unity:''' be ''very'' careful that your animations are doing what you think they are. An animation with an 'off' keyframe can make everything look faulty, even when it's actually otherwise perfect. Additionally, if you can at all, run the unity editor on two monitors. It will save you no end of headache, as you can actually get everything on the screen and open at once so as to be able to tell with absolute precision what your animations are doing, and what is transpiring in your state machine, vs what is happening in the scene. This made the difference in struggling to find a problem all afternoon and recognizing it within a few mins for me at the time that I wrote this tutorial. | ||
| + | |||
| + | '''Note also''' that the numbers showin in the scene graphs likely reflect some of the animation errors I made when making the tutorial, and should not be trusted. Before operating your door, be sure to drag the scene graph cursor down the timeline of your animation clip, and watch it in the scene view to insure it is doing exactly what you would have it do. | ||
| + | |||
| + | One last thing before diving into the 'Anitmator' view: locate the animations you've recently created, specifically the 'Open' and 'Close' animations. Uncheck the 'Loop Time' setting. This will keep them from firing repeatedly. Next locate the 'Idle' animation, and insure that 'Loop Time' ''is'' checked in the inspector interface. | ||
| + | |||
| + | If you switch to your animator view, you will see something quite interesting. The view of our animation controller has changed dramatically. This is because it is contextually aware of what we're doing. This is not miraculous, but it is pretty decent engineering. The makers of unity understood that we were going to establish a relationship between animations and arbitrary ''states'' in a ''State Machine'', and added those to our animation controller view. It also arranged them logically for us, though we will need to insure that the proper conditions are met to permit or preclude transitions between states. | ||
| + | |||
| + | Here's a view of the state machine in the node editor for the animation controller: | ||
| + | ---- | ||
| + | {| border="0" | ||
| + | ! [[File:Space-1-panel-sliding-door-tutorial-11.png]] | ||
| + | |- | ||
| + | ! | ||
| + | |- | ||
| + | ! ''Fig. 11: The node editor with the animation controller state machine loaded.'' | ||
| + | |- | ||
| + | |} | ||
| + | ---- | ||
| + | It's worth taking a moment to go a little more in-depth with respect to the ''Node Editor''. Examining the state machine, we can see it is a sort of flowchart. However, not all of the salient information about the state machine is present in this graphic representation; only the structure, as presented by an ordered set of colored and labeled icons positioned on a grid. | ||
| + | |||
| + | Three types of these icons are present in our view in the previous image ('Any State', 'Entry' and 'Exit'), and are ''terminal'' (in the literal sense), meaning that they describe entry/end points for the state machine. 'Any State' can be wired up to a state that can be entered at any time; and 'Entry' and 'Exit' are fairly self explanatory; in our animation, we never want the state machine to exit, and to only be entered according to signals from the proximity activator so these two are not wired up. | ||
| + | |||
| + | Additionally, there is one of the states that is orange: this is the default state. It is just that, and 'Entry' is always wired to it unconditionally with a transition that cannot be previewed or modified. Any otherwise mundane state can be made the default state using a pop-up menu that appears with a right-click on it's icon. | ||
| + | |||
| + | The wiring, or arrows in the view, indicate the direction of state transitions explicitly; but there are also a potential set of conditions that must be met in order for the transition to occur. The interface for setting these appears in the inspector when one clicks on the transition icon (arrow). | ||
| + | |||
| + | One last thing about this node editor: if you have it open when playing back animation clips associated with the controller that's loaded into it, it animates and indicates the state it's presently in, active transitions as they occur, and progress through the clip indicated in the state. This can be indispensible when troubleshooting animated objects. | ||
| + | |||
| + | Note the sort of clockwise flow between the states associated with our three animation clips. This is because it is only possible to reach one of these states having arrived at the one prior to it in the cycle. One does not go from an idle state to a door closing state; that is not logical. One only closes a door that is open. What we must do next is to configure the state machine such that it only opens the door when signaled to do so, and only closes it after it has been opened. This is done by setting conditions in the transitions represented by the connecting arrows. We can't do that just yet though, first we have to declare the functions in the proximity activator that are sent up as a result of the collider events. Unity has already predefined the signals for us in the state machine. To the left of the node editor interface, you's see a ''parameters'' tab open on top. The two parameters given are the signals, 'Open' and 'Close'. | ||
| + | |||
| + | The functions are to be declared in the inspector, with the Proximity Activator exposed in the interface. | ||
| + | |||
| + | At the bottom of the Proximity Activator pane in the inspector, see the ''Events'' block. There are two events, we examined briefly when we added the component; these are ''Activate'' and ''Deactivate''. Now, what we want to happen under either of these conditions is for a string to be sent up to the animation controller that matches a parameter there. This is accomplished with the ''animator.SetTrigger()'' function. This function will send up whatever string is passed to it to the Animation Controller. We want to set this funtion on both events, but each invocation with appropriate string value. These functions are added and configured in the interface by clicking the '+' sign near the event in the interface, and the resulting configuration options for the event filled from the picker in the popup. What you ultimately arrive at should be something a bit like this: | ||
| + | ---- | ||
| + | {| border="0" | ||
| + | ! [[File:Space-1-panel-sliding-door-tutorial-12.png]] | ||
| + | |- | ||
| + | ! | ||
| + | |- | ||
| + | ! ''Fig. 12: Tieing the Gameobject back to the Proximity Activator.'' | ||
| + | |- | ||
| + | |} | ||
| + | ---- | ||
| + | Now we should be ready to set conditions on the transitions in the Animation Controller's state machine. Switch to the Animator view, and in the node editor click on the transition arrow between the 'idle' state and the 'open' state. The names are just descriptive, but they should be recognizable in the interface. In the inspector, you should now see the properties for the transition. The important thing is that the right states are associated with the correct animations, and that the transitions occur in a logical fashion. The control of the transitions is through ''conditions'' set in the inspector with the transition selected: | ||
| + | ---- | ||
| + | {| border="0" | ||
| + | ! [[File:Space-1-panel-sliding-door-tutorial-13.png]] | ||
| + | |- | ||
| + | ! | ||
| + | |- | ||
| + | ! ''Fig. 13: A look at the properties of a transition in the node editor.'' | ||
| + | |- | ||
| + | |} | ||
| + | ---- | ||
| + | Take a peek at the 'Conditions' pane in the inspector: notice that it specifies 'Open' as a condition for the transition from the 'Idle' state to the 'Open' state. This is because we open the door as soon as the controller is activated by the proximity activator. The next transition in the flow has a condition set for 'Close', which is only ever activated when the proximity activator is deactivated. The final transition in states, from 'Close' back to 'Idle', happens without conditions. Configure yours as such and you should be ready to preview your door in the editor's 'play' mode. | ||
| + | ---- | ||
| − | |||
| − | |||
In this Tutorial we will illustrate the construction and configuration of three scripted doors: the Sliding Door, the Double Sliding Door and the Swinging Door.
These doors are all presently a bit simple. We'll be updating both the doors themselves and the wiki as needed.
Doors could be said to be complex game objects. They are structured collections of GameObjects and Components, and how they are assembled and "wired up" is essential to their operation. They will typically consist of some sort of framing in which the door proper and possibly a hinge sits, and the door, which may be a single mesh or in the case of the swinging door, an empty GameObject "hinge" to which the door mesh is a child.
Additionally, the various GameObjects will have certain components associated with them, typically to facilitate user interaction and to animate the GameObject.
Setting up doors can be a bit tricky, but creating content for Unity is not for the faint of heart. Hopefully, with this tutorial we can make that workflow somewhat less painful for Sinespace creators.
Level:
Goals:
Note that the first tutorial walks the content maker through very detailed workflows in order to acclimate the user to the tools and processes by which the game object is created. The remaining tutorials will not seek this depth of instruction, but rather will refer back to the first. Therefor, it's fairly important you should build at least the first door in order to grasp the fundamentals that will be somewhat bypassed in the tutorials for the remaining two doors.
If you are an experienced Unity user who is using this wiki article as a reference, feel free to skip ahead or around as needed, and god love you and help you :)
The Single Panel Sliding Door is perhaps the simplest possible articulated door. Before we get into a step-by-step walk-through of it's construction, lets break it down conceptually from the top level.
Firstly, there are three requirements of any door:
Given these requirements, we could say that we will need a structure for the door frame, of arbitrary complexity, and a structure for the door proper, of equally arbitrary complexity.
For this door, our doorframe will be fairly complex, consisting of a transom piece, a threshold piece, and left and right door posts. The door will be a single cube mesh of appropriate size and proportions to fit suitably within the frame.
To get started, create a new project for space, or perhaps use one that you have available for experimentation and development. Use the Main Menu to create the first of the cubes we'll use (Main Menu: GameObject->3D Object->Cube). Just under the left side of the main menu, click the button to expose the scaling tools. Scale the cube a bit higher than the head of the avatar you would use to walk through the door, and then a little wider than that avatar; on the remaining axis, make it proportionately thick.
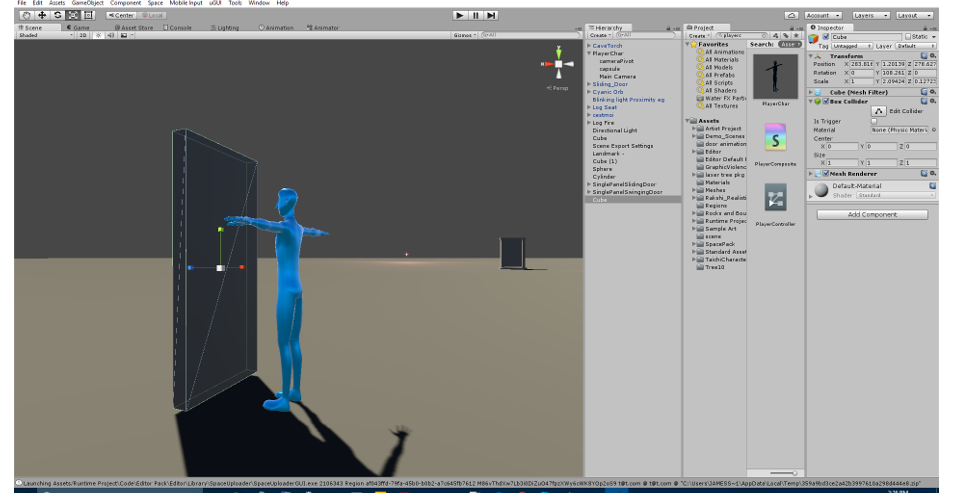
|
|---|
| Fig. 1: Sizing the door |
Next duplicate this cube. Be sure it is selected, as in the image above, then on the object in the hierarchy, right click->Duplicate. Now switch to the translation tool, and move the copy along the X axis until it is clear of the door. Switch back to the scaling tool, and edit the thickness in each horizontal direction to form the left door post. Duplicate this one just as you did the door previously, and using the translate tool, move it to the right of the door.
Perform similar operations for one each of a transom (above the door) and a threshold (below the door). It should look something similar to the image below:
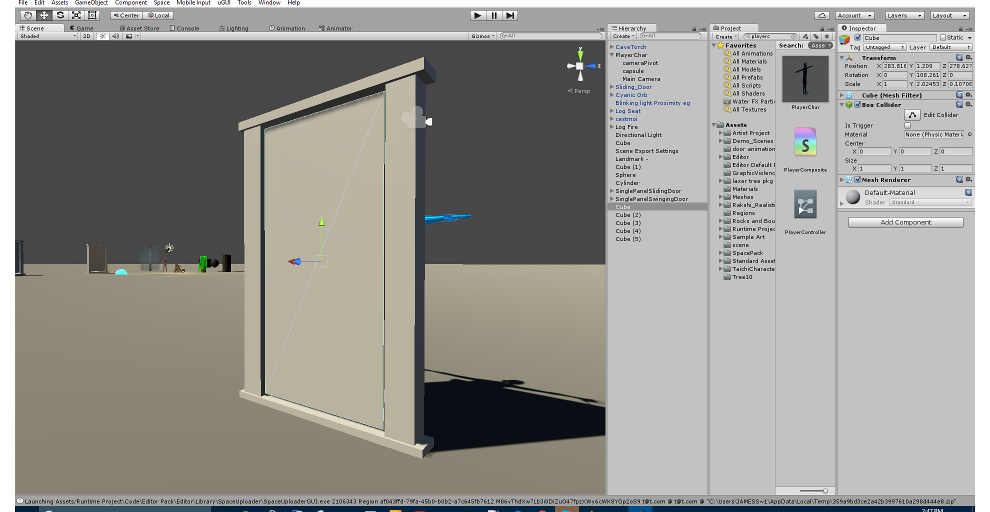
|
|---|
| Fig. 2: The completed door frame |
Now, we can't very well just fling down a couple of cube meshes and expect it to behave as a door; and we really need to start organizing things as a unit. This will be important structurally. Note also that the door's 'frame' is not as simple as it could be; it really just needs to be any rigid body mesh; in actuality, it doesn't have to be that even; it could simply be an empty game object, as in the next tutorial. The one constraint is that animation of the door will occur relative to this piece; it can be as simple or as elaborate as you like. I'd perhaps stop short of making it the bulk of a building's construction.
So first, lets rename those cubes. Let's make sure to get the names right, recognizing them will be important a little later in the process. Additionally, some structure will be important. Within the hierarchy window, create an empty GameObject (RightClick Hierarchy Window->Create Empty). Drag all the door and door frame pieces and drop them on the empty GameObject; then (again, in the hierarchy window) rename the game object something like 'SinglePanelSliding Door'. It should resemble the following image; no changes should occur in the geometry of your construction; only the logical structure in the hierachy window.
Should your door objects be oddly nested, just drag them all out and nest them as shown in the image below.
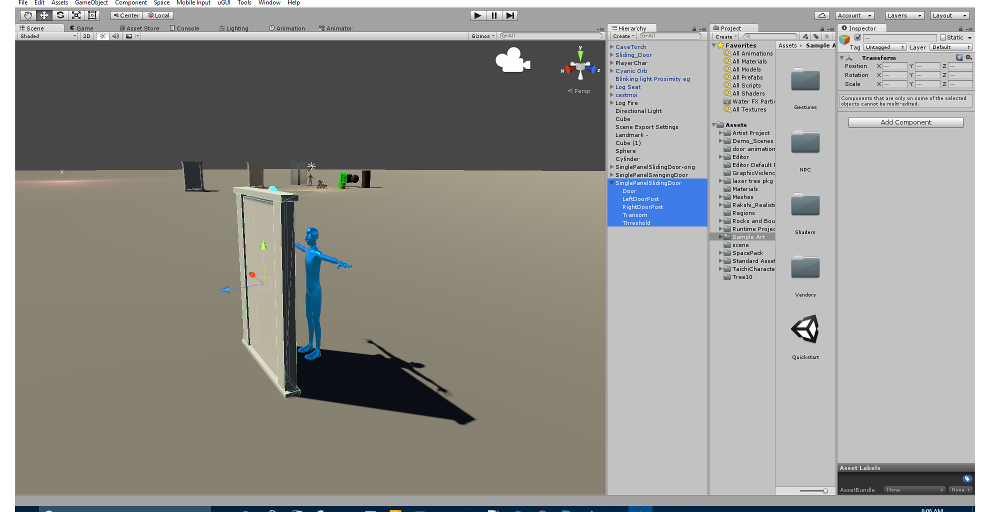
|
|---|
| Fig. 3: The logical structure of the door, highlighted in the Hierarchy view |
This structure is actually very important, if not elaborate. We're working with the simplest possible door, so the structure is the simplest possible; but rest assured that it is crucial to the operation of the door.
Before we move on to the next thing, there's one last thing we need to do to each of the elements of the door frame: make them rigid bodies. This is accomplished by adding the 'Rigid Body' script component to the inspector pane when the object is selected in the hierarchy. Once this is added, uncheck 'Use Gravity' and check 'Is Kinematic'.
Now we can begin adding the components to the structure that facillitate it's operation.
First select the container GameObject created and renamed in the last step. Then click the large 'Add Component' button at the bottom of the inspector pane in the Unity interface. In the search field at the top of the window that appears, type 'Animator'. Click on the Animator component that appears as a search result, adding the component. Repeat once for each of 'Box Collider' and 'Proximity Activator'.
Lastly (for this step), resize the box colider as shown in the following image. Editing the box collider is initiated by clicking the icon labelled 'Edit Collider' in the inspector pane. Editing the colliders uses a slightly different interface than other unity editing widgets. There are small dots in the face center of each of the collider's faces; these are handles for translating the face along it's perpendicular axis. This is the only type of editing operation to which a box collider can be subjected.
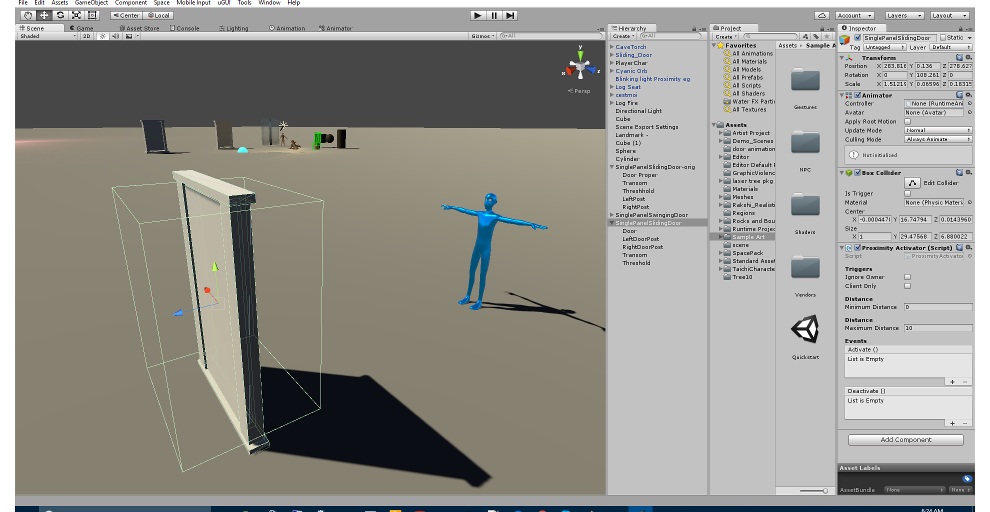
|
|---|
| Fig. 4: The Box Collider |
Next, in the inspector tab for the box collider, click the box for 'Is Trigger'. This will turn off collisions in a physics simulation sense, and enable the collider to behave as a sensor that triggers it's associated Proximity Activator. The Proximity Activator script multiplexes various signals to the animations defined in the Animation Controller configured within the Animator component. In our construct, these signals take the form of strings that are sent up as a result of the occurance of the events 'Activate' and 'Deactivate'. Multiple reactions to each of these two events may be configured in the inspector using the '+' button. They can also be removed with the '-' button.
At this point, it would probably be a good idea to create a folder in your project to contain the various elements of the animation. But you already did that probably :) If not, do that now, and get into the folder. Right click the emptiness, and Create->Animation Controller. Double clicking the object in the folder (the Animation Controller) will allow you to begin editing the component. Before you do though, be aware we still don't have animation(s) created for the door, so what you see there will neccessarily reflect that degree of completion of the door's construction.
The animation controller is what is referred to as a State Machine. It is often misidentified as a Finite State Machine or FSM. It does not meet the requirement, however, as the state machine will exist in multiple states during transitions between states.
It is configured with an interface called a Node Editor. More on that in a few minutes.
When you've finished fiddling with the Animation Controller (hopefully you didn't change stuff substantially), make sure you have the top-level door game object selected, and press 'Ctrl 6' on your keyboard (FYI you can also open the animation window for the selected object from the Windows menu on the Main Menu). This will open the animation editor. The animation editor is a scene graph editor. Almost anything can be animated in unity. If you can click on it in the hierarchy and see modifiable properties in the inspector pane, chances are it is possible to use a scene graph to generate values for that property over the course of time, producing an animation of that property.
We will be using the scene graph editor to create three scene graphs: 1. the door in it's inactive state; essentially empty from an animation perspective. 2. The door transitioning from it's idle, closed state to an open state. and finally 3. The door transitioning from it's open state to it's closed state. These animations will form the basis for what happens once the collider triggers the proximity activator sending up the appropriate signals to the animation controller via the animator component. Starting to get the picture here? don't worry, if it hasn't already, it will start to come together soon.
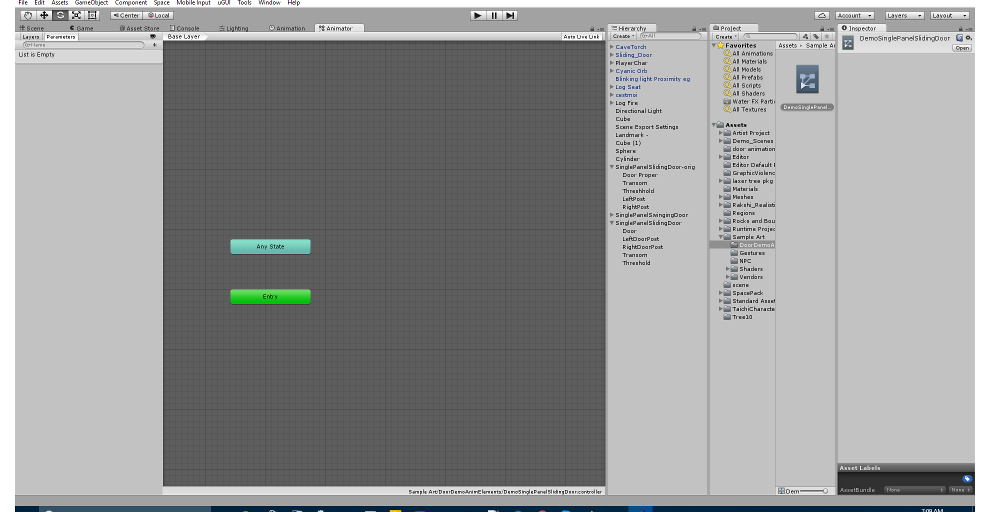
Following is a screenshot of the unity editor with the animation controller exposed in the node editor interface, as it looks without our animations in the object's context:
|
|---|
| Fig 5: An early peek at the animation controller state machine within the node editor. |
If your animation editor is not already open and displaying a button center-window labled 'Create', then select the top-level door game object in your hierarchy, and press 'Ctrl 6' on your keyboard. Then click that 'Create' button.
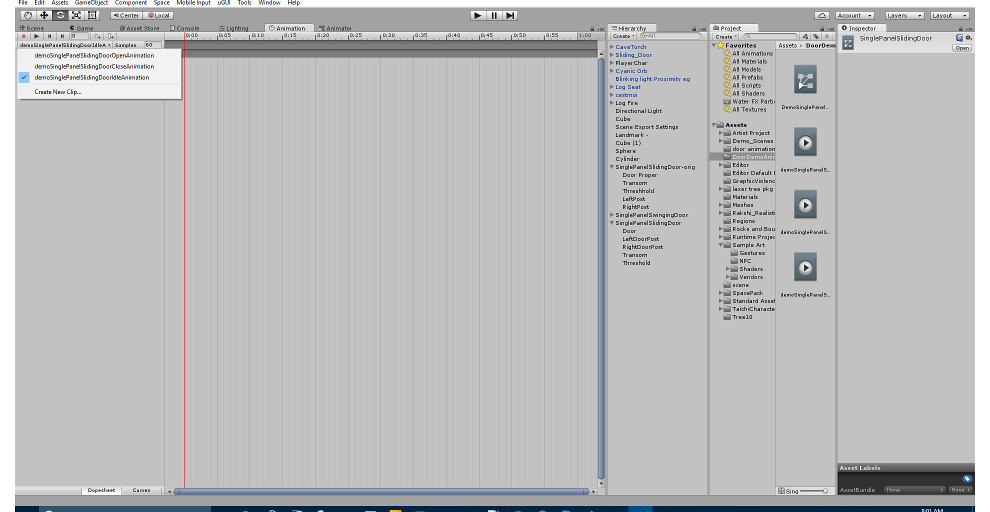
This will open a system file browser and prompt you for a new name for the clip as they are called within the context of the scene graph editor. Give it a unique and descriptive name; this will be the first of the three previously mentioned animations (Idle or 'closed'). When this is done, you will see the animation's name displayed on the scene graph editor's window/tab at the far left of the second row (toolbar). This is a drop down list, with the final item on the list always being 'Create New Clip...'. Go ahead and create all three and make sure they appear on the drop down list as shown in the image that follows:
|
|---|
| Fig. 6: Setting up the animation clips. |
Select the clip for 'open' in the dropdown list, and click the 'Add Property' button. What this is going to do is instantiate a picker containing a tree of all the object properties who's values may be varied by scene graph. This picker structures the items into the tree based on the container hierarchy reflected in the folder-like organization in the hierarchy view. This is how that structure begins to impact the context of of the object vs it's animated properties.
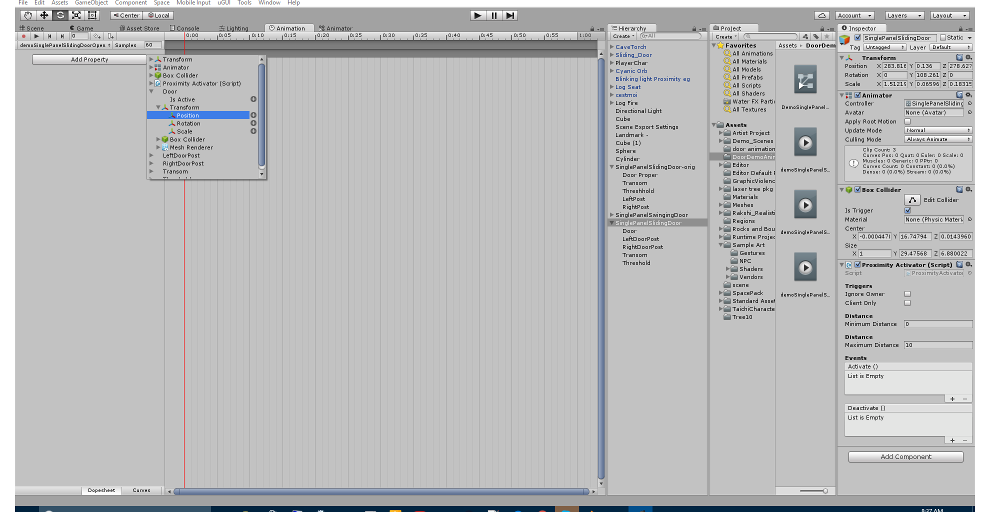
The property you'll want to add will be Door->Transform->Position. If your door is named something other than 'Door', then you'll want to pick your door name out of the picker tree instead. To finally add the property to you clip, click the little '+' to the right of the property you're adding. It should look a lot like this:
|
|---|
| Fig. 7: Adding properties to a clip so their scene graphs can be manipulated. |
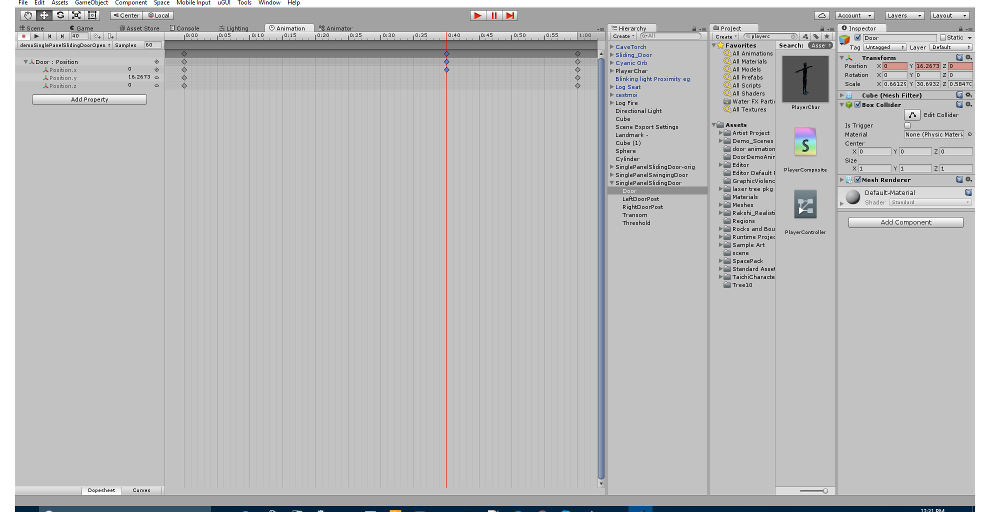
Having clicked the little plus, you'll now have a position property above the 'Add Property' button. Click the switch triangle to it's left to open it. You'll now see the scene graphs for each of the three properties of the position: X, Y, and Z. We'll be animating the 'X' property. On the time scale across the top of the scene graph opposite the properties, click about two thirds right on the scale. This should set the time cursor forwards about 2/3 the way through the scene graph. Next, right-click on the intersection between the X axis on the scene graph (horizontal, top property of the position), and the time cursor you just set. Select 'add keyframe' from the popup menu this click generates. You'll see a screen greatly resembling this:
|
|---|
| Fig. 8: Setting up Keyframes. |
Now click on the diamond that appeared on the scene timeline. This is your keyframe. You should also notice to the right of the property label back on the left side of the screen, a number. Click it. Select the number and copy it with 'Ctrl-C'. Change it from '0' to '1'. If yours has a different number, say, 6.73, make it 7.73, or perhaps 5.73 if you'd like to have the door slide to the other side. If you have rotated your door to some arbitrary rotation, you're going to have problems moving forward with this tutorial; but don't be concerned, there are straightforward methods for doing that, we're just not going there at this time. So, if you switch to your 'Scene' view, you'll see very something like this:
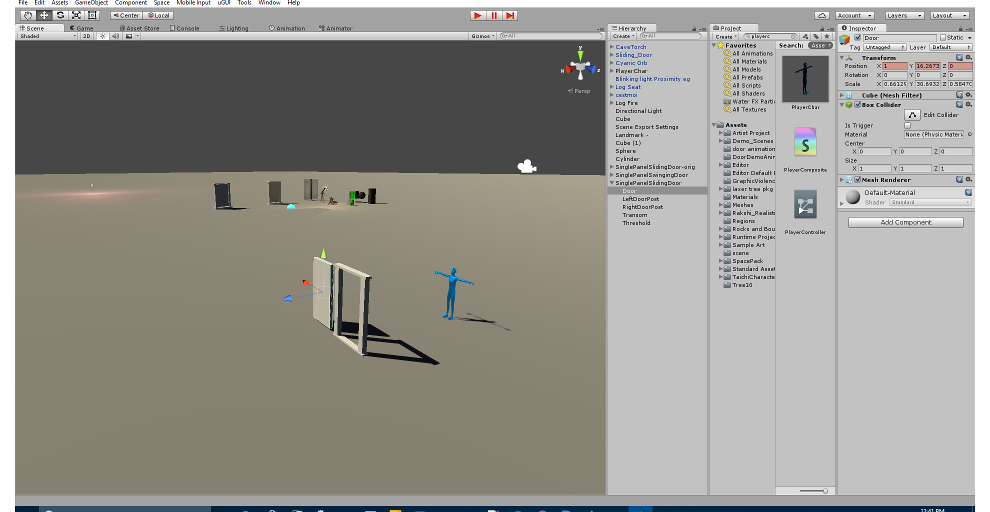
|
|---|
| Fig. 9: The scene view, with the scene graph cursor in the animation editor positioned on the final frame of the 'Open' animation. |
If you haven't yet, switch back to the 'Animation' view. Don't confuse it with the 'Animator' view. Now on the dropdown list just above the properties tree for the door, select your 'close' clip. We've yet to fiddle with this one, so we repeat the process starting with adding a position property for the door (hint: it's a Transform).
Next add a keyframe by right-clicking the intersection between the 'X' positional property and somewhere around 40 frames into the scene graph timeline. Finally, select the last diamond at the intersection of the scene graph and the 'X' property axis (it's the first frame). Now back on the left hand side where the numbers are, click whatever number is there and replace it with the one you copied earlier (Ctrl-V or Shift-Ins). You should have something approximating this:
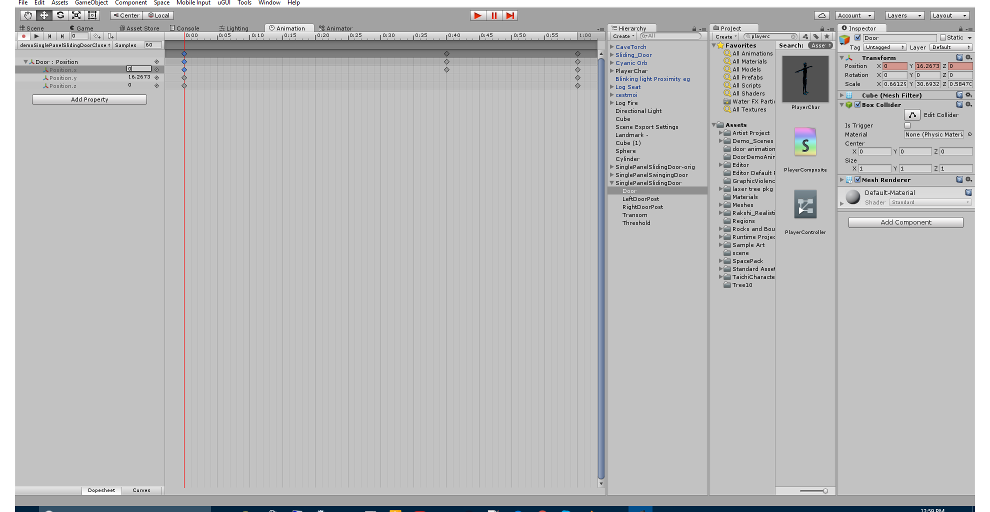
|
|---|
| Fig. 10: Setting the initial value for a property in the animation editor. |
Additionally, if you have a peek at your scene view, you will see that the door has closed again. That's a good thing (tm). Don't forget, we've been working in the 'Animation' view, not the 'Animator' view. That's about to change, though.
A quick note on authoring animations in Unity: be very careful that your animations are doing what you think they are. An animation with an 'off' keyframe can make everything look faulty, even when it's actually otherwise perfect. Additionally, if you can at all, run the unity editor on two monitors. It will save you no end of headache, as you can actually get everything on the screen and open at once so as to be able to tell with absolute precision what your animations are doing, and what is transpiring in your state machine, vs what is happening in the scene. This made the difference in struggling to find a problem all afternoon and recognizing it within a few mins for me at the time that I wrote this tutorial.
Note also that the numbers showin in the scene graphs likely reflect some of the animation errors I made when making the tutorial, and should not be trusted. Before operating your door, be sure to drag the scene graph cursor down the timeline of your animation clip, and watch it in the scene view to insure it is doing exactly what you would have it do.
One last thing before diving into the 'Anitmator' view: locate the animations you've recently created, specifically the 'Open' and 'Close' animations. Uncheck the 'Loop Time' setting. This will keep them from firing repeatedly. Next locate the 'Idle' animation, and insure that 'Loop Time' is checked in the inspector interface.
If you switch to your animator view, you will see something quite interesting. The view of our animation controller has changed dramatically. This is because it is contextually aware of what we're doing. This is not miraculous, but it is pretty decent engineering. The makers of unity understood that we were going to establish a relationship between animations and arbitrary states in a State Machine, and added those to our animation controller view. It also arranged them logically for us, though we will need to insure that the proper conditions are met to permit or preclude transitions between states.
Here's a view of the state machine in the node editor for the animation controller:
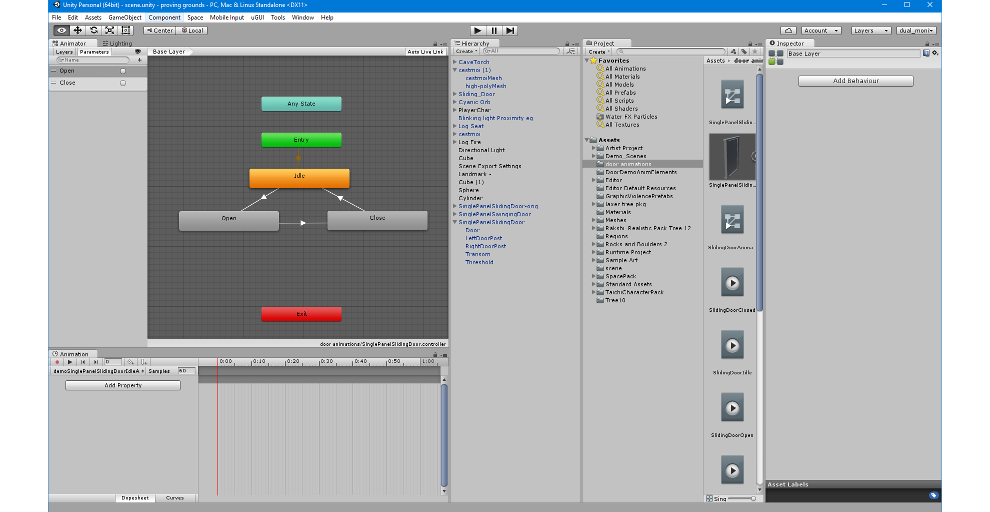
|
|---|
| Fig. 11: The node editor with the animation controller state machine loaded. |
It's worth taking a moment to go a little more in-depth with respect to the Node Editor. Examining the state machine, we can see it is a sort of flowchart. However, not all of the salient information about the state machine is present in this graphic representation; only the structure, as presented by an ordered set of colored and labeled icons positioned on a grid.
Three types of these icons are present in our view in the previous image ('Any State', 'Entry' and 'Exit'), and are terminal (in the literal sense), meaning that they describe entry/end points for the state machine. 'Any State' can be wired up to a state that can be entered at any time; and 'Entry' and 'Exit' are fairly self explanatory; in our animation, we never want the state machine to exit, and to only be entered according to signals from the proximity activator so these two are not wired up.
Additionally, there is one of the states that is orange: this is the default state. It is just that, and 'Entry' is always wired to it unconditionally with a transition that cannot be previewed or modified. Any otherwise mundane state can be made the default state using a pop-up menu that appears with a right-click on it's icon.
The wiring, or arrows in the view, indicate the direction of state transitions explicitly; but there are also a potential set of conditions that must be met in order for the transition to occur. The interface for setting these appears in the inspector when one clicks on the transition icon (arrow).
One last thing about this node editor: if you have it open when playing back animation clips associated with the controller that's loaded into it, it animates and indicates the state it's presently in, active transitions as they occur, and progress through the clip indicated in the state. This can be indispensible when troubleshooting animated objects.
Note the sort of clockwise flow between the states associated with our three animation clips. This is because it is only possible to reach one of these states having arrived at the one prior to it in the cycle. One does not go from an idle state to a door closing state; that is not logical. One only closes a door that is open. What we must do next is to configure the state machine such that it only opens the door when signaled to do so, and only closes it after it has been opened. This is done by setting conditions in the transitions represented by the connecting arrows. We can't do that just yet though, first we have to declare the functions in the proximity activator that are sent up as a result of the collider events. Unity has already predefined the signals for us in the state machine. To the left of the node editor interface, you's see a parameters tab open on top. The two parameters given are the signals, 'Open' and 'Close'.
The functions are to be declared in the inspector, with the Proximity Activator exposed in the interface.
At the bottom of the Proximity Activator pane in the inspector, see the Events block. There are two events, we examined briefly when we added the component; these are Activate and Deactivate. Now, what we want to happen under either of these conditions is for a string to be sent up to the animation controller that matches a parameter there. This is accomplished with the animator.SetTrigger() function. This function will send up whatever string is passed to it to the Animation Controller. We want to set this funtion on both events, but each invocation with appropriate string value. These functions are added and configured in the interface by clicking the '+' sign near the event in the interface, and the resulting configuration options for the event filled from the picker in the popup. What you ultimately arrive at should be something a bit like this:
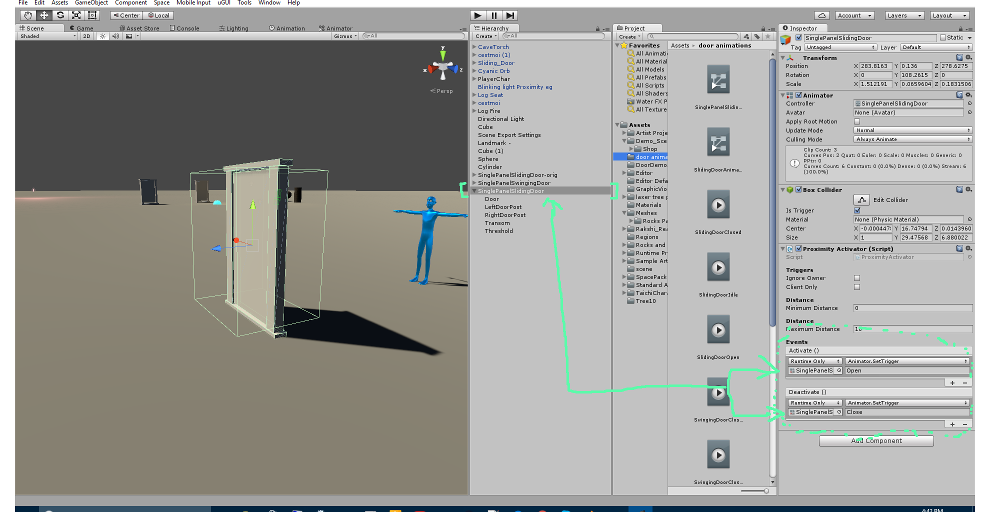
|
|---|
| Fig. 12: Tieing the Gameobject back to the Proximity Activator. |
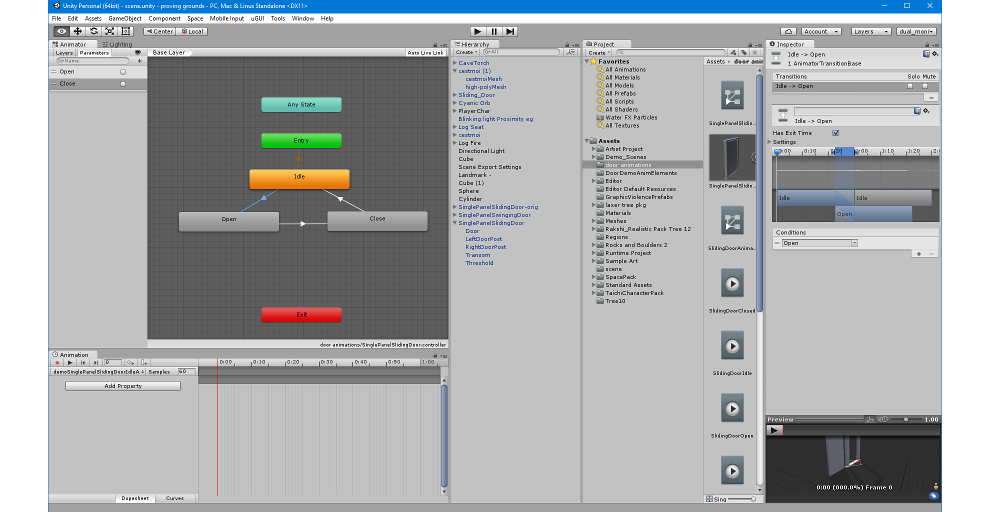
Now we should be ready to set conditions on the transitions in the Animation Controller's state machine. Switch to the Animator view, and in the node editor click on the transition arrow between the 'idle' state and the 'open' state. The names are just descriptive, but they should be recognizable in the interface. In the inspector, you should now see the properties for the transition. The important thing is that the right states are associated with the correct animations, and that the transitions occur in a logical fashion. The control of the transitions is through conditions set in the inspector with the transition selected:
|
|---|
| Fig. 13: A look at the properties of a transition in the node editor. |
Take a peek at the 'Conditions' pane in the inspector: notice that it specifies 'Open' as a condition for the transition from the 'Idle' state to the 'Open' state. This is because we open the door as soon as the controller is activated by the proximity activator. The next transition in the flow has a condition set for 'Close', which is only ever activated when the proximity activator is deactivated. The final transition in states, from 'Close' back to 'Idle', happens without conditions. Configure yours as such and you should be ready to preview your door in the editor's 'play' mode.
| |||||
| |||||||||||||||||
| ||||||||||||||||||||||||||||||||||||||
| |||||||||||