Skin is a texture image that replaces the default skin of your avatar. Skins can be re made and uploaded in Sine Space using Virtual Goods component.
Avatar Skin
You can download the default avatar skin template from following links.
Importing Skin to Unity
Once you have created the Skin save the PSD and import it back to Unity.
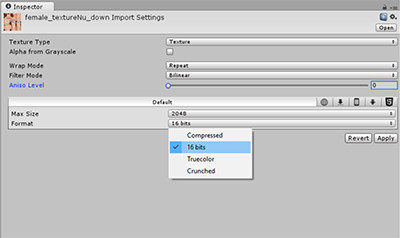
Setting imported Skin Texture
- Select the imported skin texture.
- Set Texture Type as texture.
- Alpha to Grey Scale unchecked.
- Wrap Mode Repeat.
- Filter Mode Sets the filter suggested set it to bilinear.
- Aniso level Sets the anisotropic level.
- Max Size Set to 2048.
- Format can be set to Compressed or 16 bit for a better quality.
- Once done hit Apply

Setting imported Skin Normal Map
Normal Map gives more definition to the skin.
Once you have imported the normal map
- Select the imported skin texture.
- Set Texture Type as Normal map.
- Alpha to Grey Scale unchecked.
- Wrap Mode Repeat.
- Filter Mode Sets the filter suggested set it to bilinear.
- Aniso level Sets the anisotropic level.
- Max Size Set to 2048.
- Format can be set to Compressed or 16 bit for a better quality.
- Once done hit Apply
File:Setting_normalmap.jpg|400px]]
Setting the Skin material
you can create a new material and drag skin texture and normal map in normal map slot.
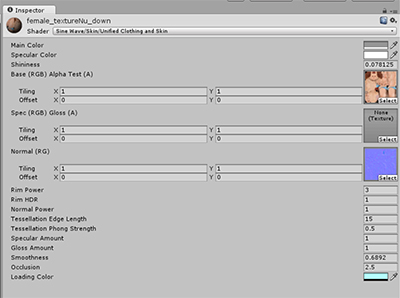
Once the material is created you can chose the material shader for skin from built in unity standard, custom shader or SineWave skin shader.
SineWave Skin Shader
- Main Color - Sets the overall color of the skin.
- Specular Color - Tints specular highlights of the skin.
- Shininess - Sets the shine amount of the skin.
- Rim Power - how rim lighting spreads around the edges of the model.
- Rim HDR - Adds a boost to rim lighting, to enable it push into HDR values (i.e. Brighter than white) for bloom.
- Normal Power - controls power of normal map (allowing them to be more/under represented)
- Tessellation - allows DX11 Tessellation which smooth's geometry when camera is up close.
- Specular Amount - Sets the specular amount.
- Gloss Amount - Sets how glossy the skin should look.
- Smoothness - controls specular highlights on PBR platforms (higher = tighter highlights), correlates with Standard shader.
- Occlusion - controls ambient occlusion.
- Loading color - For internal use. PLEASE IGNORE THIS SETTING.

Using Make clothing component to fit the Skin
Once the skin material is created, it needs to be converted to fit the skeleton.
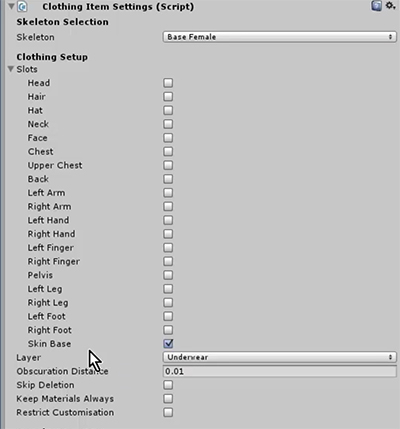
Create an empty game object in the scene and add the Make Clothing or Attachment Component to it.
Skeleton Selection
Chose the relevant Skelton for the clothing item. Please note Space supports multiple third party skeletons as well as it's own native male and female models.
Slots
If you are creating only skin, select Skin Base slot. If you want the skin to have more than just skin select other applicable slots.

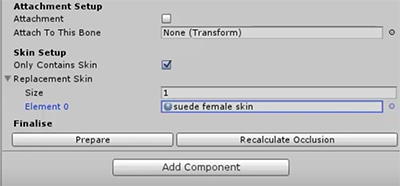
Skin Setup
Select Only contains skin if you are uploading skin only. If you are doing a combined outfit Don't select this.
- Note : if you are not making just skin you will have to click on Convert to skinned button later. if you are creating just skin this step is not needed and the button will disappear as soon as you select Skin only.
Replacement Skin
Set the number of material the skeleton you are using has.
Sine Space male and female skin only has 1 material; if you have selected that as the skeleton Set the size to 1.
After the size is set. Drag the skin material in the material slot.

Add virtual goods script
Attach the virtual goods script and complete the submission process.
See Virtual Goods for more details on the virtual goods script.
Video Tutorial
To know more on how to create and upload skins watch the tutorial shown here
Further Reading
| Content Creation Portal
|
|
|
| Common
|
|
|
|
| Vehicles
|
|
|
|
| Gestures
|
|
|
|
| Humanoid Animation
|
|
|
|
| Clothing
|
|
|
|
| Region Creation
|
|
|
|
| Quests
|
|
|
|
| Games
|
|
|
|
| General Info
|
|
|
|
| Customisable Regions
|
|
|
|
| Scripting
|
|
|
|
| Creator Support
|
|
|
| List of Common Components
|
|
|
| Common & Creator Related
|
|
|
|
| Vehicle Related
|
|
|
|
| Avatar Related
|
|
|
|
| Gesture Related
|
|
|
|
| Scene Related
|
|
|
|
| Quest Related
|
|
|
|
| Merchant Related
|
|
|